A blog about food, beauty, curls and everyday living.

Showing posts with label diy. Show all posts

The Creamiest Tomato Soup (that’s also vegan and gluten-free – astonishingly!)


There is nothing more comforting than a bowl of steaming tomato soup on a wet and miserable day. And whilst we are now in to the summer months in England, Mother Nature clearly didn’t get the memo!
I wanted to replicate that old classic tomato soup that we all know and love from Mr Heinz. It’s creamy and smooth, and very ‘tomatoey’ but also on the sweeter side.


As I try not to consume too many animal fats, I wanted to find an alternative to cream. Having recently enjoyed a delicious cashew cream dessert from a local deli I immediately knew that cashew nuts were going to be my new favourite super ingredient (sorry coconut, we had some good times together, but it’s time to move on).


Makes 4 starter-sized bowls


Ingredients:

1kg vine tomatoes (I used a mixture of larger vine tomatoes as well as piccolo for their sweetness)
2 medium carrots, diced
3-4 cloves of garlic
1tsp olive oil
8 – 10 raisins (for sweetness)
60g raw cashews
250ml vegetable stock (1 tsp of this bouillon from Marigold mixed with boiling water is a great vegan alternative to fresh stock) 
Salt and pepper to taste
 

Method:

Preheat oven to 160C/gas mark 4. Halve any larger tomatoes and place in a baking tray with the carrot and smaller tomatoes. Season with salt and pepper, drizzle with olive oil and bake in the oven for 30-40 minutes. After that time, the tomatoes should be soft but not caramelised. Add the cashews, garlic and raisins. Bake for a further 10-15 minutes, until the cashew nuts are golden. 


Heat the stock until just warm. Ladle half the ingredients in to a mixer (I used my Nutribullet – yet again!) and mix with half of the stock until smooth. Empty the soup to a container or pan and blend the other half of the mixture with the rest of the stock. I use the remaining stock to deglaze the roating tin to achieve maximum flavour potential. Either heat the soup through and eat immediately or store in the fridge for up to four days.


To make soups extra special – or just a little more exciting – I like to top them with flavoursome ingredients. Here, I fried field mushrooms with black kale and garlic and also included some roasted cashews.


Now, my husband enjoys dunking a great hunk of crusty bread, which doesn’t exactly follow the gluten-free trend, but then again I’m not sure he has cottoned on that this soup is fit for even the strictest of vegans (shhhhh)!

Sprucing Up Old G Plan Dining Chairs

My beloved G Plan dining chairs were an awesome find from The Modern Show last year held at Dulwich College, SE London. I wasn’t necessarily in the market for new dining chairs but as soon as I saw the perfect mix of teak and dark wood I knew I had to have them! Luckily, my husband and I had travelled in his roomy work van so our impromptu purchase didn’t incur any hefty delivery charges.


The only thing I didn’t love about them was the original fabric that was covering each of the seats: a rather itchy cord material in dark grey with large white spots (extremely retro, but not in a good way).  I knew that re-covering them would be a fairly simple job and I have been textile hunting ever since.


And then there I was in John Lewis last week, just browsing in the haberdashery (as you do), when I saw it...An art deco style fan patterned fabric in navy. It had a slight stretch to it too which is great quality to look for when re-upholstering. It wasn’t a bad price either at £10 per meter (especially as I only needed one).

To cover 4 chairs:


1m fabric
Scissors
Slotted screwdriver
Staple gun
Staples (13/6mm)


I began by using a screwdriver to release the screws and remove the seats. I was going to get rid of the old fabric but decided against it as I didn’t know what condition the padding would be in underneath and had visions of being covered in stuffing.


I trimmed around the seat, following the contours, leaving about 5-7cm clearance. I then made two small cuts at each ‘corner’ and fixed these with a staple.


To keep the fabric from bunching, I placed a loose staple to attach the fabric at the centre of each of the sides. Working out from that centre point towards each corner, I used the ‘stretch and pleat’ method, stapling as I went. If I noticed some gaping then I simply cut a vertical slit (4cm) in the excess fabric so that it could be easily overlapped and fixed with a staple.


I worked my way round in the same way – working from the centre, out to the corners – stretching, pleating and stapling as I went. I then checked that everything looked smooth and not ‘bunched’ from the top of the seat and threw in some extra staples for good measure.


I re-attached the seats by inserting and tightening the screws. (I removed the screws again shortly after, as I wanted to trim away the excess material that wasn’t visible at all but was driving me crazy because ‘I knew it was there’ and re-attached them for the second time).


So there you go – easy! Just three more chairs to go...


Gooey Chocolate Brownies (With an Easter Twist)

These gooey brownies are extremely easy to make and taste amazing! If you are feeling creative, try topping some them with flaky nests. I have to admit, they were slightly fiddly, but were well worth the effort as they looked great and tasted extra chocolaty.


Makes 2 small trays (around 18 brownies)


Ingredients:


200g caster sugar
125g salted butter, melted
30g cocoa powder
½ tsp vanilla extract
2 medium eggs
110g plain flour
¼ tsp baking powder


For the Nests:

3 Cadbury’s Flake bars
1 pack Milkybar Mini Eggs
30g dark chocolate, melted


Method:


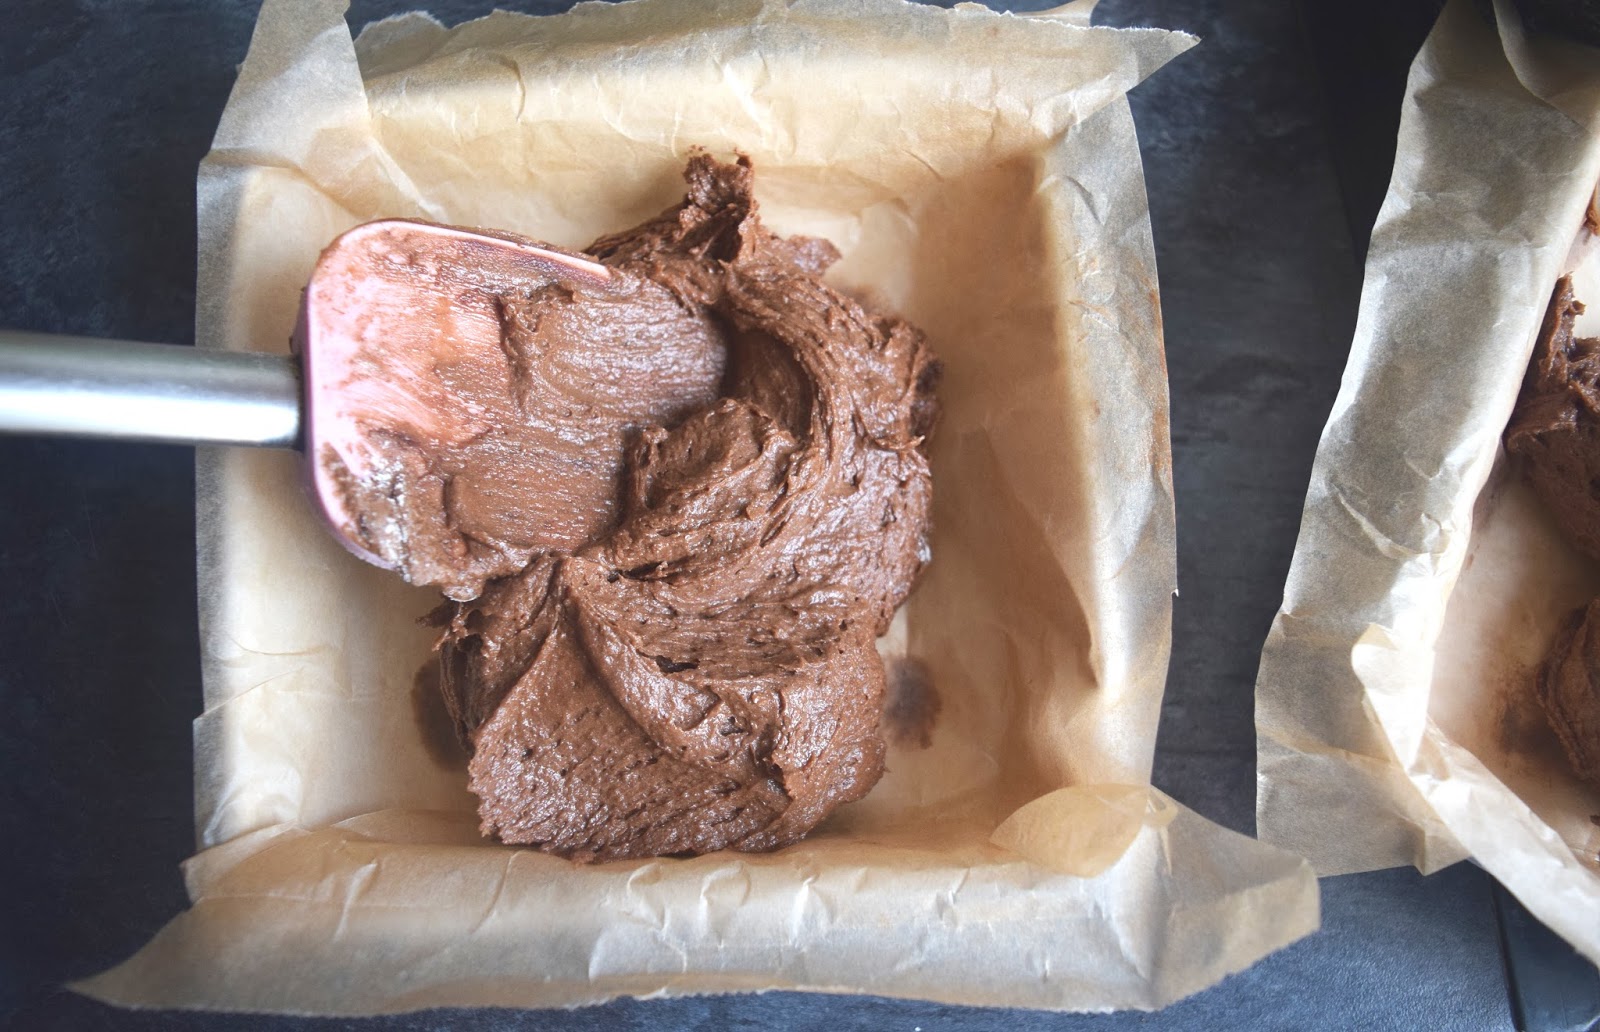
Begin by lining a deep tray 20cm x 10cm with greaseproof paper (I used two 10 x 10 trays which worked fine too). When lining trays, I find it easier to cut a piece of greaseproof slightly larger than the area needed and then cut a small incision from each corner (at 45 degrees) towards the middle of the paper.  This will help when placing the paper inside, as each corner can then be overlapped to fit snugly in to the corners of the tray. 

Once the mixture has been made, a little blob on each corner of the tray will help to hold the lining in place and stop it from sliding around. Preheat the oven to 180C and weigh out all of the ingredients so that the mixing process is quick and efficient. 

Add the sugar and butter to a mixing bowl and using an electric mixer, beat until light and fluffy. Add the cocoa powder, vanilla, and eggs - one at a time - continue to mix on high speed until you have a smooth mixture.


Add the baking powder to the flour and fold in with a spatula or wooden spoon. 


Pour the mixture in to the tray and then even it out with the back of a spatula. Bake in the oven for 20-25 minutes.

The longer you leave them, the more ‘set’ they will be once cool. I personally prefer a gooey brownie so I opt for just 20 minutes. Remove from the oven and when slightly cool, place in the fridge until ready to use.


Whilst the brownies are baking, make the nests. Simply melt the dark chocolate and cut the flake bars length ways to create long, thin ‘shards’. I think that dark chocolate works best here for adhering as it dries quickly and is less temperamental when melting. But by all means, use milk chocolate if you want the joins to be less obvious (and don’t go thinking that you can use any wastage from the Flakes; the stuff just will not melt! Which leaves me wondering - why the hell not?)


Place some of the shards in a small triangular(ish) shape. Dip the ends in melted chocolate to allow them to stick together. Then dip the bottom of the eggs in the chocolate and place them on top of the triangle base.


Add extra flakes wherever you need more support, using the ‘dip and stick’ method. 

These should be refrigerated until the chocolate ‘glue’ has set. Once the brownies are completely cool, slice them in to even squares and use a fish slice to lift and place the nests on top. You can use the chocolate ‘glue’ here too so that the nests don’t topple off.


You can make these a few days ahead and leave them refrigerated in an airtight container. You will of course then have to avoid the temptation to eat them before intended.


Happy Easter everyone!

Wedding Series – The Guest Book

I thought long and hard about how I wanted to receive (and keep) messages from our guests on the day. And I‘m glad I did! Even if a guest book seemed quite a trivial component of the day; after all, your loved ones will wish you well in person on the day, why do you need them to also write it down?  I have three reasons why:  1) you may not even get to speak to them at all, 2) even if you do get round to everyone, you will never remember what they said, and 3) it’s nice to have a physical ‘something’ from the actual day to remind you how happy everyone was for the two of you.

Matt Ethan Photography

I had several ideas quite early on: messages typed an old fashioned typewriter; marriage advice written on recipe cards and stored in a recipe box, entitled ‘recipe for a successful marriage’; selfie Polaroid’s with handwritten messages on the back; and then there was just the plain ol’ traditional guest book. The possibilities really are endless.

As we wanted the tone of the wedding to be relaxed and non-traditional, it didn’t make sense to go for anything too conventional. I also knew that I was going to incorporate many vintage aspects in to the decor and ‘look’ of the day (my Grandmother’s china tea set, antique vases, and well...my whole ensemble). So I took some inspiration from our honeymoon plans; a road trip across the West Coast of America and started collecting a bunch of blank vintage postcards featuring places we intended to visit on our trip. I sent these out with the invites and asked everyone to write their message and bring it along on the day. Of course I bought extras for those who, like me, would forget.


People included honeymoon suggestions, marriage advice, well-wishes and even thank you notes for being included in the day. The great people at the venue hung string across trellis and I bought the cutest little pegs from Ebay for the postcards to be hung up as if on a washing line. It looked effective and meant that guests could read each other’s notes. I also loved that everyone had enough time to really think about what they wanted to write and didn’t feel rushed on the day.

Matt Ethan Photography

At the end of the night I just unhooked the string and packed the whole line away. I’ve since stored them in a memory box at home but would now like to transfer them to an album that is more easily accessible, so that whenever I feel like I need a little reminder of the day it’s in easy reach.

Matt Ethan Photography


Who else had an original guest book idea? I’d love to hear about them.

Wedding Series - DIY Confetti Cones

Matt Ethan

When envisaging my wedding, even from a very young age, I pictured that truly celebratory moment of having an abundance of colourful confetti floating around me on my way back down the aisle, hand-in-hand with my new husband. I was what you could call a bit ‘deflated’ to discover that it isn’t like it is in the movies! People don’t just spontaneously throw endless amounts of confetti at you once the ‘I do’s’ are done: They wait politely, until they are told to throw pre-approved (biodegradable) confetti at the pair of you, once the photographer has arranged the guests (that actually remembered to bring along a boxful of the stuff) in to two neat lines. 

Matt Ethan

Well, I wanted it to be like it is in the movies! Admittedly, I was very lucky that my venue allowed any type of confetti to be thrown at any time I wished, anywhere I wished. So I decided to put some confetti together myself. Mainly because I knew that many people do forget to bring their own – yes, I have been one of those guests who have very good intentions but then ditch it at the last moment when it takes up too much space in the clutch bag.


I went for a mixture of colours and textures; bright circles cut from tissue paper, dried and tissue paper rose petals in neutral colours, dried petals and foliage (from a colourful bouquet I had been bought a few weeks before the wedding), and the most original choice – brightly coloured hearts cut from traditional Monopoly money and cards.

Okay, I know it sounds pretty bizarre, but as we got married in London I liked that it gave a gentle nod to our ‘theme’, as well as it adding lots of colour to the confetti. I‘m also pretty sure that every single guest would hold a fond (or not so) memory of playing this particular board game at Christmas time so it provoked a little nostalgia. And what better time is there to take a trip down memory lane than at a wedding?


They were extremely quick and easy to put together and not half as fiddly as they look. I used a piece of kraft paper measuring 15cm x 11cm for each one.


Simply roll each one and fix with a small piece of sellotape – or even better, these glue dots from Pritt (they stick anything and are practically invisible - a MUST for your wedding DIY kit).


I attached a little tag to each one, some with our names, and others with the date. I then placed them standing in a wooden crate made for Kilner Jars. This meant that the cones stood up straight and could be stuffed with confetti well in advance (one less job to get done on the day – winner!).

Matt Ethan

The cones were handed out during the ceremony, just before the big announcement. You know the one where the registrar says “Can I please present to you, Mr and Mrs ...”? So that when we made our way back down the aisle as husband and wife, we were showered with fluttering confetti.

Matt Ethan

Confetti shots really are my favourite!

Wedding Series - Mirror Table Plan

The table plan was one of my favourite projects and actually didn’t require too much time, artistic ability, or even many materials - especially if you use a mirror that you already own (yes, I did have a huge mirror-shaped space on the wall in my lounge for several weeks before the wedding).


Materials:

2 cans of matte white spray paint
Ruler
Sellotape
4 sheets of A4 card
Liquid chalk pen (bought from a small DIY store)


Method:

Begin by making sure that the mirror is large enough for the amount of guests you are seating (I had 84 guests seated in a horseshoe shape but you could easily do this with circular tables). One tip I could offer is to use a mirror that matches the shape of your actual venue space.

*My mirror was originally black so I spray painted it white, covering the edges of the mirror with masking tape. I left this to dry for a few hours and then began making the template for the tables.

 Create your template using thick card. For me this meant piecing together one 30cm x 7cm rectangle and two 64 x 7cm. I needed 32 names along each length of the template so 64cm was enough for each name to take up 2cm.

Lightly stick the template to the mirror using a few pieces of rolled sellotape (majority of stickiness removed on the back of your hand) and make sure it is positioned correctly before you begin drawing.
Draw round the template with liquid chalk (I also used a ruler for this) and peel the template away. If you make any mistakes, the liquid chalk can be removed with glass cleaner and a rough cloth.

Before you begin to write your names on to the mirror, map out where each name will be. I simply placed a little sellotape at each space as a marker (and to check that they would all fit) then copied each name over from a plan I had drawn in a notebook. 


 I loved how it looked so much that even now, some five months after the wedding, I just can’t bring myself to scrub it off! The mirror is now back in its rightful place in my lounge...still resembling a table plan, but not planning on reverting any time soon. 

Coming Soon - The Wedding Series

We are quite a while away from it being full blown wedding season, but I thought of all those lovely couples who got engaged over the festive period and realised that a bit of inspiration can never come too early... Cue the wedding series!

I thought it would be nice to share some DIY ideas with those of you looking to get a bit ‘crafty’ for your big day. First on my list for this coming Wednesday is an antique mirror table plan - watch this space...


My husband and I tied the knot in August 2015 in our beautiful hometown, London. The whole day was pretty laid-back and relaxed, and included lots (and lots) of DIY details. Some I made myself with the help from my wonderful bridesmaids, and others, including my veil and flower girl’s dresses, were made by good ol’ mum (who is amazingly talented, and a pro with a needle and cotton).

I will admit that it was so easy to get caught up in ‘wedding fever’ that once the day was over, and we had returned from honeymoon,  I began to feel almost redundant – you know, that feeling when you should be doing something but you’re not quite sure what?! And then one a rainy Sunday afternoon - just as the wedding blues were setting in - I received an email from our amazing photographer, Matt Ethan, to inform me that our big day was going to be featured on the website I once regarded as my ‘bible’ – rockmywedding.co.uk. If you want to check it out, head over there and have a read of my interview where I explain a bit more about the planning process. But for now here are just a few of my favourite images...


All images - Matt Ethan Photography

Post Signature

Post Signature